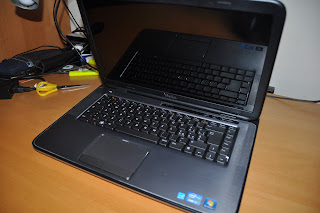
First you need to have a star tip screwdriver , a lever (I used a plectrum) and of course a replacement monitor (I bought it on https://www.laptopscreen.com/ in 4 days is arrived, everything as I ordered, fast and secure) and if you want upgrade the monitor from 720 to 900 or even a 1080p you need LVDS FHD cable (I have ordered on Ebay after a long search and sure they had the exact product number). Also updated all the drivers for the video card (Nvidia in my case) to have everything up to date.
Prima di tutto bisogna avere una cacciavite dalla punta a stella, una levetta (io ho usato un plettro ma si possono usare le levette per le cover degli smartphone) e ovviamente un monitor sostituto (io l'ho acquistato su https://www.laptopscreen.com/ , in 4 giorni mi è arrivato , tutto come l'ho ordinato , veloce e sicuro) e nel caso di un upgrade del monitor da 720 a 900 o 1080p anche un cavo LVDS apposito (dovete procurarvelo voi io l'ho ordinato su Ebay dopo una lunga ricerca e sicuro che avesse il product number esatto). Inoltre aggiornate tutti i driver della scheda video (nel mio caso Nvidia ) così da avere tutto aggiornato.
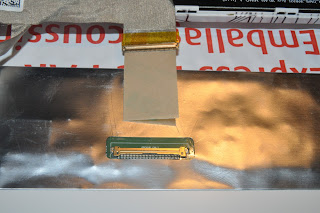
IMG2 MONITOR CAVO LVDS
OLD NEW
LVDS CABLE HD 720p ----> LVDS CABLE FHD 1080p
0T73D3 0V73D3
MONITOR 720p ----> MONITOR 1080p [ LAPTOPSCREEN ]
AUO WXGA 1366x768p GLOSSY AUO WUXGA B156HW01 v.4 MATTE 1920x1080p
STEP 1 :
To replace the LVDS cable first of all we have to separate the screen from the rest of the notebook. Turn it and withdraw the battery and unscrew the screws indicated (they along with other screws need to separate monitor from the laptop):
Dovendo sostituire prima di tutto il cavo LVDS dobbiamo separare lo schermo dal resto del notebook. Giriamolo e togliamoli la batteria e svitiamo le viti indicate (esse insieme ad altre viti serviranno per separare in monitor dal laptop) :
STEP 2 :
Loosen the screw shown and push the two tabs indicated so as to lift the plate which surrounds the keyboard. Use the pick calmly sliding and leveraging. Once lifted, rotate towards yourself and disconnect cables of the touchpad as shown in the picture.
Svitare la vite indicata e spingere le due linguette indicate in modo da sollevare il piatto che fa da cornice alla tastiera. Utilizzate il plettro con calma facendolo scorrere e facendo leva. Una volta tolto con calma lo girate verso di voi stando attenti a non staccare i tirare con forza i connettori del touchpad che poi dovrete scollegare.
STEP 3 :
Remove the keyboard by leveraging the points indicated. Also rotate towards yourself slowly and disconnect the connector (two connectors if you have the backlit keyboard).
Togliere la tastiera facendo leva nei punti indicati. Anch'essa farla ruotare verso di se lentamente e scollegare i connettori(due connettori se avete la tastiera retro illuminata).
STEP 4 :
The LVDS cable is shown in the picture. Remove calmly, unscrew the screws indicated and remove the monitor (there is another cable, is the Wlan, leave it attached well being careful)
Il cavo LVDS è quello indicato nell'immagine. Togliamolo con calma , svitiamo le viti indicate e solleviamo il monitor LCD (noterete che rimane un cavo, è quello della Wlan, lasciatelo pure attaccato stando attenti)
STEP 5 :
Take off the plastic cover of the monitor with decisive strokes but not exaggerated (in the picture the position of tabs), unscrew the screws indicated and carefully raise the display. Now we need to first disconnect the connector of the webcam and then the cable LVDS HD original.
Togliamo la cover in plastica del monitor con colpi decisi (in immagine la posizione delle linguette) , svitiamo le viti indicate e facendo attenzione solleviamo il display. Ora bisogna staccare prima il connettore della webcam e poi il cavo LVDS HD originale.
STEP 6 :
Now the LCD should be separate from the cover, you can leave the monitor and LVDS cable stuck together, but need to remove the side's supports of the display that will contain the new display. Unscrew the screw indicated, are in total 4, two on each side.
Ora il display LCD si dovrebbe separare dalla cover , dovendo sostituire monitor e cavo lvds posso lasciarli attaccati assieme , devo però togliere le spalle del display che andranno poi a contenere il nuovo display. Svitiamo la vite indicata, sono in totale 4 , due per lato.
STEP 7 :
Now install the LVDS cable on the new monitor, be careful. After reinstall the monitor support.
Inserite il cavo LVDS stando attenti e reinstallate le spallete sul monitor nuovo.
STEP 8 :
Basically this is the end, do the guide in reverse, turn the netbook and if you have done everything perfectly all work. If the screen should remain black check the LVDS cable plugs that they MUST be installed GOOD.
Praticamente avete finito, eseguite la guida a ritroso , accendete il netbook e se avete eseguito tutto alla perfezione tutto funzionerà. Se la schermata dovesse rimanere nera verificate che gli spinotti del cavo LVDS siano BEN installati.
Ovviamente non mi assumo alcuna responsabilità , il tutto a vostro rischio e pericolo.
Some pictures to see the difference between the two monitors.
AUO GLOSSY LCD 1366x768p HD WXGA
AUO B156HW01 V.4 MATTE LCD 1920x1080p FHD WUXGA
Quest' opera è distribuita con licenza Creative Commons Attribuzione - Non commerciale - Non opere derivate 3.0 Unported.


